
Quilting is a joyful and creative way to express your love for fabric, color, and cozy design.
If you’re new to quilting and looking for a project that’s both charming and approachable, this cat appliqué patchwork quilt is the perfect place to start.
Why Choose a Cat Appliqué Quilt?

Cat-themed quilts bring personality and warmth to any space. With each block featuring a different cat silhouette, fabric pattern, and accessory, this project allows you to explore color coordination, appliqué techniques, and basic quilting skills—all while creating something adorable.
Materials You’ll Need
- Assorted cotton fabrics in soft pastels and cheerful prints (floral, gingham, polka dots)
- Dark blue fabric with small white dots for the border
- Lightweight fusible web for appliqué
- Embroidery floss or thread for facial details
- Fabric scissors and rotary cutter
- Sewing machine
- Iron and ironing board
- Batting and backing fabric
- Quilting pins and ruler
Step-by-Step Instructions
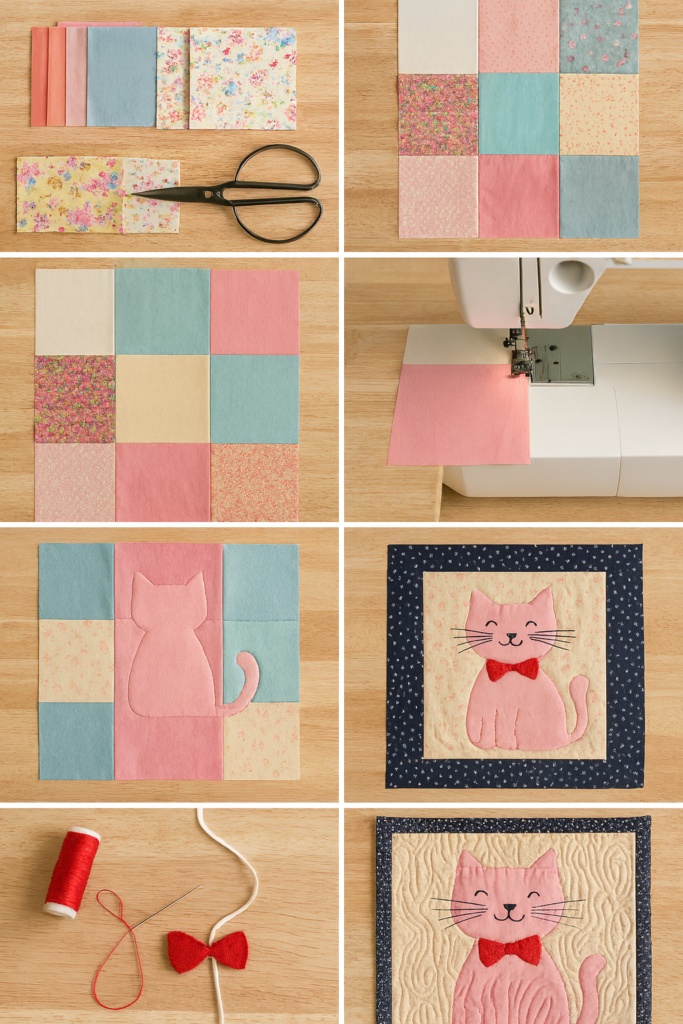
1. Prepare Your Fabric
Cut nine 9″ x 9″ squares from a mix of solid and patterned fabrics. These will form the background for each cat block. Choose colors that complement each other and evoke a cozy, playful mood.
2. Create Cat Appliqués
Draw or trace nine different cat silhouettes onto the paper side of fusible web. Iron the fusible web onto the back of your chosen appliqué fabrics, then cut out the cat shapes. Each cat can have a unique look—try bows, collars, or curled tails for variety.
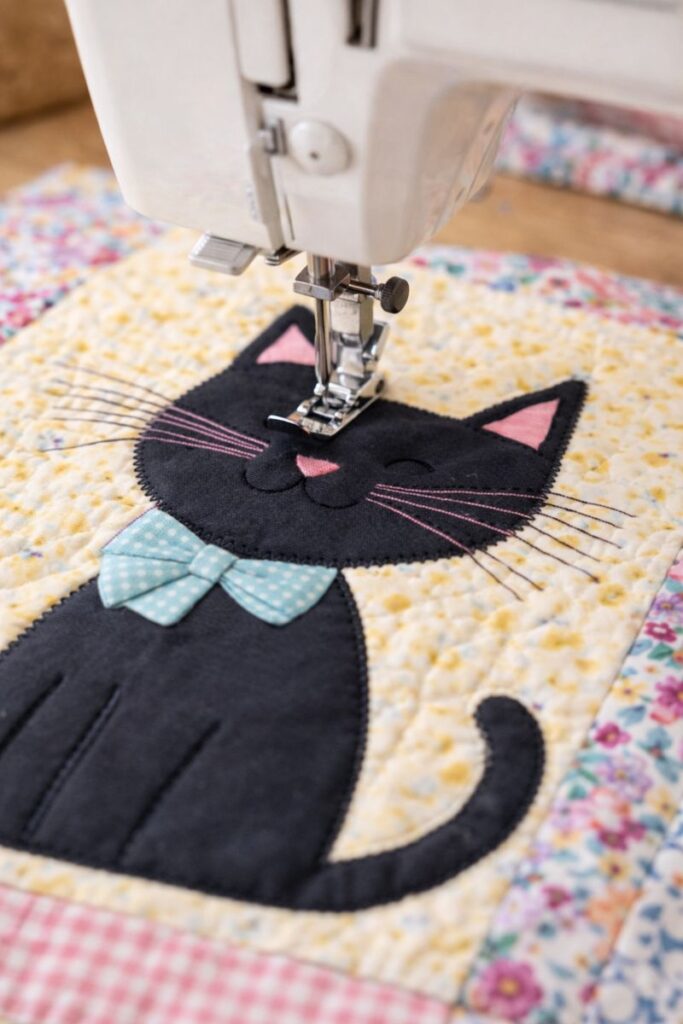
3. Fuse and Stitch
Center each cat appliqué on a background square and iron to fuse. Use a straight stitch or zigzag stitch around the edges to secure. Embroider facial features like eyes, nose, mouth, and whiskers using black or dark gray thread.
4. Assemble the Quilt Top
Arrange the nine blocks in a 3×3 grid. Sew the blocks together row by row, then join the rows. Press seams flat.
5. Add the Border
Cut strips of dark blue polka dot fabric and sew them around the quilt top to create a frame. This adds contrast and helps unify the design.
6. Layer and Quilt
Create a quilt sandwich with backing fabric, batting, and your quilt top. Pin securely. Quilt using free-motion or straight-line stitching, following the contours of the cats and patchwork seams.
7. Bind and Finish
Trim the edges and bind the quilt using coordinating fabric. Your beginner-friendly cat appliqué quilt is now complete!
Final Tips
- Keep your stitches consistent and take your time with appliqué placement.
- Mix textures and patterns for visual interest.
- Use warm natural lighting when photographing your finished quilt to highlight its charm.
This project is ideal for gifting, decorating a craft room, or simply enjoying the satisfaction of handmade textile art. Happy quilting!