
Quilting is a timeless craft that allows creativity to flourish through beautiful and intricate designs.
Among the many quilt block patterns, the Weathervane quilt block stands out for its striking symmetry and classic appeal.
Whether you’re a novice quilter or looking to expand your quilting repertoire, this step-by-step guide will help you master the Weathervane quilt block with ease.
What is a Weathervane Quilt Block?
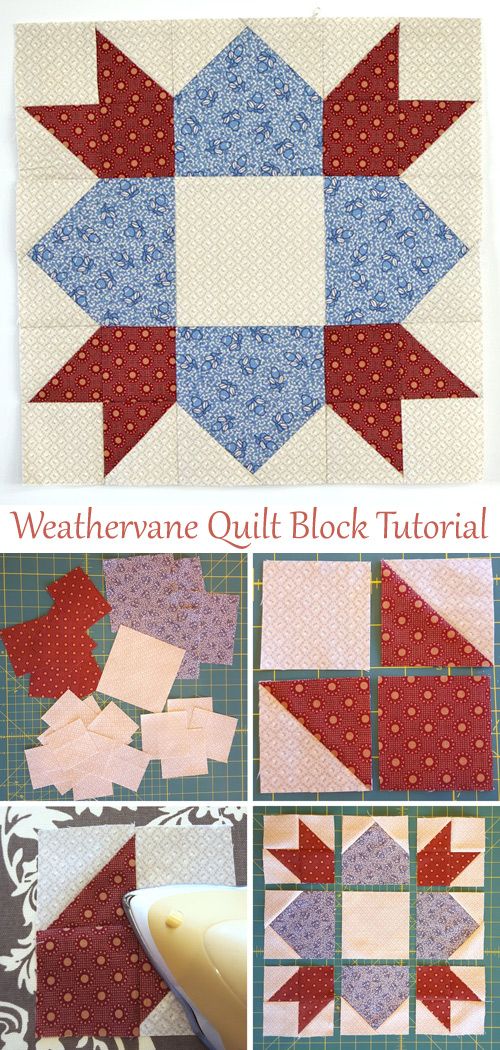
The Weathervane quilt block is a traditional quilt pattern characterized by a central square surrounded by triangles and rectangles, creating a dynamic and symmetrical design that resembles a weathervane. This pattern is versatile and can be made using a variety of color schemes, making it a favorite among quilters of all levels.
Materials Needed
Before diving into the quilting process, gather the necessary materials:
- Fabric: Choose three contrasting fabrics – a light, medium, and dark fabric – to highlight the different sections of the block.
- Cutting Tools: A rotary cutter, self-healing cutting mat, and acrylic ruler.
- Sewing Machine: A reliable sewing machine, though hand sewing is also an option.
- Thread: High-quality, neutral-colored thread.
- Iron and Ironing Board: Essential for pressing seams.
- Quilting Pins: To hold pieces in place while sewing.
Step-by-Step Instructions
Step 1: Cutting the Fabric
Accuracy in cutting is crucial for creating a precise Weathervane quilt block. Here’s how to cut your fabric pieces:
- Center Square: Cut one 4.5-inch square from the dark fabric.
- Quarter Square Triangles: Cut two 5.25-inch squares each from the light and medium fabrics. These will be cut into quarter square triangles.
- Half Square Triangles: Cut two 5-inch squares each from the medium and dark fabrics. These will be cut into half square triangles.
- Rectangles: Cut four 4.5-inch by 2.5-inch rectangles from the medium fabric.
- Corner Squares: Cut four 2.5-inch squares from the light fabric.
Step 2: Making the Half Square Triangles (HSTs)
- Pair the Squares: Place one medium fabric square and one dark fabric square right sides together.
- Draw a Line: Draw a diagonal line from one corner to the opposite corner on the back of the lighter fabric.
- Sew: Sew a 1/4-inch seam on both sides of the drawn line.
- Cut: Cut along the drawn line to create two HSTs.
- Press: Open and press the seams towards the darker fabric.
- Trim: Trim each HST to measure 4.5 inches square.
Repeat this process with the remaining medium and dark fabric squares to make a total of four HSTs.
Step 3: Making the Quarter Square Triangles (QSTs)
- Pair the Squares: Place one light fabric square and one medium fabric square right sides together.
- Draw a Line: Draw a diagonal line from one corner to the opposite corner on the back of the lighter fabric.
- Sew: Sew a 1/4-inch seam on both sides of the drawn line.
- Cut: Cut along the drawn line to create two HSTs.
- Press: Open and press the seams towards the medium fabric.
- Pair the HSTs: Place one HST on top of the other, right sides together, with opposite fabrics touching (light against medium).
- Draw a Line: Draw a diagonal line from one corner to the opposite corner, perpendicular to the seam.
- Sew: Sew a 1/4-inch seam on both sides of the drawn line.
- Cut: Cut along the drawn line to create two QSTs.
- Press and Trim: Open, press the seams, and trim each QST to measure 4.5 inches square.
Repeat this process with the remaining light and medium fabric squares to make a total of four QSTs.
Step 4: Assembling the Weathervane Block
Now that you have all your pieces, it’s time to assemble the block.
- Arrange the Pieces: Lay out the pieces in a 9-patch grid:
- Row 1: QST, rectangle, QST.
- Row 2: Rectangle, center square, rectangle.
- Row 3: QST, rectangle, QST.
- Sew the Rows: Start by sewing the pieces together in each row. Use a 1/4-inch seam allowance. Press the seams of each row towards the rectangles to reduce bulk.
- Join the Rows: Sew the three rows together, matching seams carefully. Press the final seams open or to one side, depending on your preference.
Step 5: Final Pressing and Trimming
Give your Weathervane quilt block a final press, ensuring all seams are flat. Trim the block to ensure it measures 12.5 inches square, with all edges even and straight.
Tips for Success
- Precision is Key: Accurate cutting and sewing are essential for creating a block that fits together perfectly.
- Press Seams Carefully: Pressing seams as you go helps to keep your pieces flat and manageable.
- Use a Design Wall: If possible, use a design wall to lay out your pieces before sewing. This helps visualize the final block and ensures the pieces are in the correct position.
- Chain Piecing: To save time, use the chain piecing method where you sew several pieces together in one continuous line without cutting the thread between each piece.
Variations and Creative Ideas
Once you’re comfortable with the basic Weathervane quilt block, experiment with different variations:
- Color Play: Try using different color combinations to see how the design changes. Play with contrasting colors or use a monochromatic palette for a different effect.
- Fabric Choices: Mix and match various fabric patterns and textures to add depth and interest to your blocks.
- Block Sizes: Adjust the size of the block by changing the dimensions of the pieces. Smaller blocks can be more challenging but create a stunningly detailed quilt.
Conclusion
The Weathervane quilt block is a beautiful and rewarding pattern for beginners to master. Its classic design and versatility make it a staple in the quilting world.
By following these step-by-step instructions, you’ll be able to create your own stunning Weathervane quilt block and, with practice, even piece together a full quilt.
Happy quilting!