
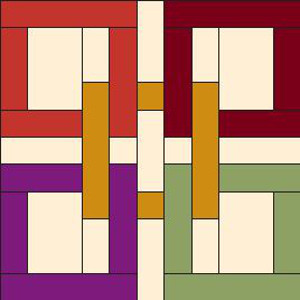
The Celtic Squares Block is a stunning quilt design that merges traditional Celtic knotwork with modern quilting techniques.
Known for its intricate appearance, this block gives the illusion of interlocking loops and curves, reminiscent of the ancient Celtic art found in tapestries and stone carvings.
Although it looks complex, the Celtic Squares Block can be simplified for beginners with the right guidance. This tutorial will walk you through creating a beautiful Celtic Square Block with easy-to-follow instructions and a free pattern.
What is the Celtic Squares Block?
The Celtic Squares Block is a quilting pattern that mimics the appearance of interwoven knots and loops. While traditional Celtic art often features continuous, flowing designs, this block uses simple fabric strips and applique techniques to create a similar effect on fabric.
The result is a block that looks intricate and sophisticated but is achievable even for those new to quilting.
Why Choose the Celtic Squares Block?
For beginners, the Celtic Squares Block is a fantastic way to dive into more decorative and symbolic designs while improving basic quilting skills. It offers the opportunity to practice applique, accurate cutting, and working with strips of fabric. This block also allows you to experiment with color and texture, adding depth to your overall quilt.
Materials Needed
Here’s what you’ll need to create one Celtic Squares Block:
- Fabric for Strips (Celtic Knotwork): Choose two to three contrasting fabrics. Fat quarters or scrap fabric will work well for this.
- Background Fabric: A solid or lightly patterned fabric that contrasts with your strips. A fat quarter will be sufficient.
- Rotary Cutter and Mat: For accurate fabric cutting.
- Ruler: A quilting ruler is essential for cutting straight strips and measuring.
- Sewing Machine: Standard sewing machine will do the job, though you may also sew by hand if you prefer.
- Thread: Choose a coordinating thread for both the applique and block assembly.
- Pins or Fabric Glue: To hold the strips in place while sewing.
- Applique Needle (Optional): If you’re doing the applique by hand, you’ll need a small, sharp needle.
Finished Block Size
This tutorial will create a finished 12-inch Celtic Squares Block. Adjustments can be made for smaller or larger blocks by changing the size of the fabric strips and background fabric.
Cutting Instructions
For this block, we will use a combination of strip-piecing and applique techniques. Begin by cutting your fabric pieces:
- Background Fabric: Cut 1 square at 12.5″ x 12.5″ from your background fabric.
- Celtic Knotwork Strips: Cut 4 fabric strips at 1.5″ x 12.5″ from each of your chosen knotwork fabrics. You may cut more strips if you wish to create a more complex knot design.
Step-by-Step Instructions for Assembling the Celtic Squares Block
Let’s begin crafting your Celtic Squares Block!
Step 1: Creating the Knotwork Strips
- Cutting the Strips: Start by cutting four strips of fabric at 1.5″ x 12.5″ from each of your chosen fabrics. You should have at least eight strips in total if you’re using two fabrics, or twelve strips if you’re using three different fabrics.
- Press the Strips: After cutting, press your fabric strips to ensure they are flat and crisp. If you want a more curved look, you can press them into slight curves. This will make the knotwork appear more fluid and dynamic.
- Arrange the Strips: Begin by arranging the fabric strips on top of the background fabric in a square pattern, leaving a border of background fabric around the edges. The goal is to make the strips appear as though they are weaving over and under each other. You can experiment with the arrangement to find the design that looks best to you.
- Pin or Glue in Place: Once you are satisfied with your arrangement, use pins or fabric glue to hold the strips in place. This will prevent them from shifting as you sew.
Step 2: Sewing the Knotwork Strips
- Topstitching the Strips: Using your sewing machine, topstitch each fabric strip to the background fabric. Sew close to the edges of the strips to secure them in place. If you prefer, you can use an applique stitch or a decorative stitch to add texture to the design.
- Create the Over-Under Effect: To achieve the classic Celtic knot effect, leave gaps in your stitching at certain intersections where one strip appears to pass over another. You can do this by pausing your stitch and lifting the presser foot at those points. This technique will give the illusion that the strips are weaving through each other.
- Press the Block: After stitching all the strips in place, give your block a good press to smooth out any wrinkles and ensure the fabric lies flat.
Step 3: Final Assembly of the Block
Now that the knotwork is complete, we’ll focus on finishing the block:
- Trim the Block: If needed, trim the block to 12.5″ x 12.5″ to ensure it’s square and ready for assembly with other blocks.
- Square the Corners: Check the corners of your block to make sure they are square. If any of the strips extend beyond the edges, trim them down so that the block is neat and even.
- Press Again: Give your block one final press to ensure that all seams are flat and the block is crisp and ready to join with other quilt blocks.
Tips for Success
- Start Simple: As a beginner, start with a simple arrangement of fabric strips to create a basic Celtic knot. As you gain confidence and skill, you can experiment with more complex designs.
- Play with Colors: The Celtic Squares Block offers a great opportunity to experiment with color. Use fabrics with high contrast to make the knotwork stand out against the background, or try a monochromatic scheme for a subtle effect.
- Use Fabric Glue: If you’re worried about the fabric strips shifting as you sew, fabric glue can be a great alternative to pins. It holds the fabric in place while you work and won’t leave any holes or marks in the fabric.
- Test Your Stitches: Before stitching the knotwork strips onto the background, test your stitches on a scrap piece of fabric to ensure that your machine is set up properly and the stitches look clean.
- Experiment with Applique: If you enjoy handwork, try using applique techniques to attach the knotwork strips. Applique allows for more intricate and delicate designs, though it takes a bit more time and patience.
Variations of the Celtic Squares Block
As you gain experience, you can start playing with different variations of the Celtic Squares Block. Here are a few ideas to inspire your creativity:
- Multi-Colored Knotwork: Use several different fabrics for the knotwork strips to create a colorful and dynamic block. Each strip could be a different color or pattern, creating a vibrant quilt block full of energy and movement.
- Curved Knotwork: Instead of using straight fabric strips, try curving them to create more fluid and organic knotwork designs. This will add complexity to the block and make it look more like traditional Celtic art.
- Scrappy Celtic Block: Use fabric scraps to create the knotwork, giving the block a patchwork feel. This is a great way to use up leftover fabric and add texture to the design.
Conclusion
The Celtic Squares Block is a beautiful and rewarding quilting project that’s perfect for beginners who are ready to try something new. With its intricate appearance and timeless design, this block adds a touch of elegance to any quilt.
By following the step-by-step instructions in this guide, you’ll be able to create your own stunning Celtic Squares Block with ease. Remember to start simple, take your time, and enjoy the creative process. Happy quilting!