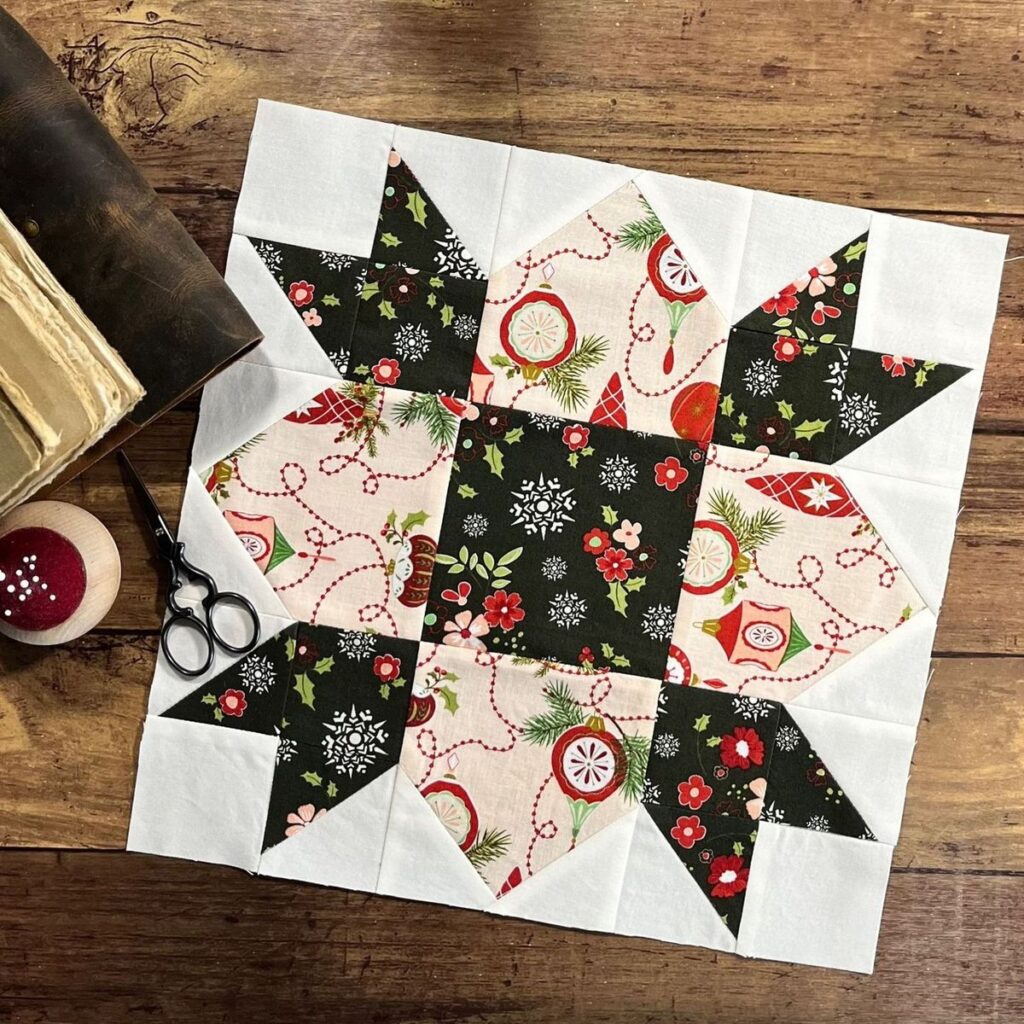

The Sawtooth Star block is one of the most classic and versatile quilt blocks, perfect for quilters of all skill levels, especially beginners.
With its bold and striking design, this block consists of a large central square surrounded by “flying geese” units, creating a starburst effect.
In this guide, I’ll walk you through the steps to create a Sawtooth Star block, providing you with a free pattern and detailed instructions to get you started.

What is the Sawtooth Star Block?
The Sawtooth Star block is a traditional quilt block design that dates back to the early 19th century. It’s known for its simple yet visually impactful design, consisting of a central square and four triangle-shaped units that form the star points.
This block can be used alone or repeated in a quilt to create beautiful, geometric patterns. The versatility of the Sawtooth Star block allows for endless possibilities when it comes to color combinations and layouts.
Materials Needed
Before diving into the steps, let’s gather the necessary materials for creating a single Sawtooth Star block.
- Fabric for the Star Points: You’ll need a contrasting fabric for the star points. A fat quarter or a fabric scrap will work fine.
- Fabric for the Background: A solid fabric that contrasts with the star points, which will make the star pop. About 1/4 yard should suffice.
- Fabric for the Center Square: You can choose a bold fabric or even a print for the center square to add interest.
- Rotary Cutter and Mat: These tools will help you cut precise fabric pieces.
- Ruler: A quilting ruler will help ensure accuracy in your cuts.
- Sewing Machine with Quarter-Inch Foot: Consistent seam allowances are crucial for this block, and a quarter-inch foot will help with that.
- Thread: Choose a neutral cotton thread that matches your fabrics.
- Iron and Ironing Board: Pressing your seams as you sew is key to achieving crisp and flat blocks.
- Pins or Clips: To hold your pieces together as you sew.
Finished Block Size
For this tutorial, we will be creating a 12-inch finished Sawtooth Star block. Adjustments can be made to create smaller or larger blocks by changing the size of your cut pieces.
Cutting Instructions
To create a 12-inch finished Sawtooth Star block, you’ll need to cut the following pieces:
- Star Center Square: Cut 1 square at 6.5″ x 6.5″ from your feature fabric.
- Star Point Units: Cut 4 rectangles at 3.5″ x 6.5″ from your star point fabric.
- Background Triangles: Cut 8 squares at 3.5″ x 3.5″ from your background fabric.
- Corner Squares: Cut 4 squares at 3.5″ x 3.5″ from your background fabric.
Step-by-Step Instructions for Assembling the Sawtooth Star Block
Now that we have all the materials and pieces ready, let’s start assembling the Sawtooth Star block.
Step 1: Create the Flying Geese Units
The Flying Geese units make up the star points in this block. We’ll use the “no waste” method to create these units efficiently.
- Place Background Squares: Take 4 of the 3.5″ x 3.5″ background squares. Place one square, right sides together, on the right end of a 3.5″ x 6.5″ star point rectangle. Make sure that one corner of the background square aligns with the top right corner of the rectangle.
- Mark a Diagonal Line: Using a ruler and a pencil or fabric marker, draw a diagonal line from the top left corner to the bottom right corner of the background square.
- Sew Along the Line: Sew directly on the line you marked.
- Trim and Press: After sewing, trim the excess fabric to 1/4″ from the seam, then press the background fabric towards the corner. You should now have a triangle on the end of your rectangle.
- Repeat for the Left Side: Now, place another 3.5″ x 3.5″ background square on the left side of the rectangle, again aligning one corner with the top left of the rectangle. Mark a diagonal line from the top right to the bottom left and sew along this line. Trim and press the fabric towards the corner.
- Finish All 4 Flying Geese Units: Repeat this process with the other three rectangles and background squares until you have four completed Flying Geese units.
Step 2: Assemble the Sawtooth Star Block
Now that we have our Flying Geese units, we can assemble the block.
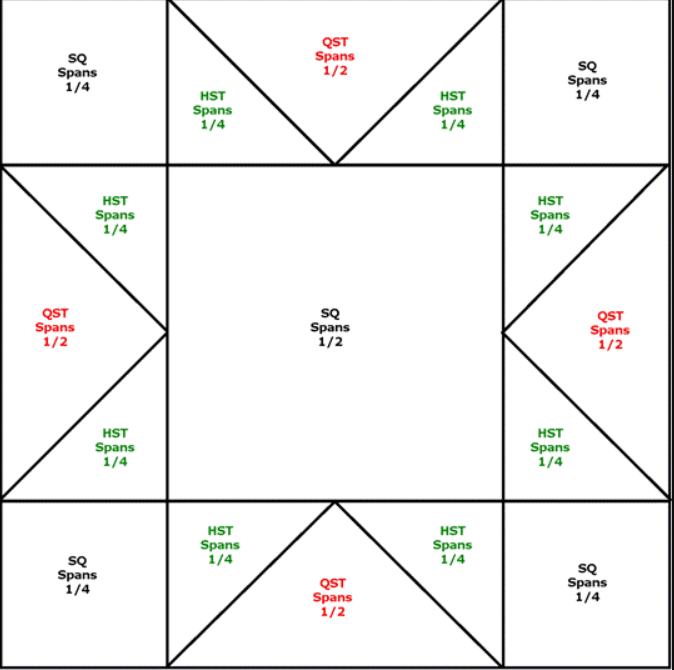
- Layout the Block: Lay out all the pieces for your block in a 3×3 grid. The center square will be in the middle, with a Flying Geese unit on each side pointing towards the center. Place the 3.5″ x 3.5″ background squares in the four corners of the grid.
- Sew the Rows Together: Begin by sewing the units together in rows. For the top row, sew a corner square, a Flying Geese unit, and another corner square together. For the middle row, sew a Flying Geese unit, the center square, and another Flying Geese unit together. Finally, sew the bottom row the same way as the top row, with corner squares and a Flying Geese unit in the middle.
- Press Seams: After sewing each row, press the seams. For best results, press the seams in alternating directions to reduce bulk at the intersections.
- Sew the Rows Together: Once the rows are assembled and pressed, sew them together to complete the block. Align the seams carefully to ensure the points of the star are sharp and accurate.
- Press the Final Seams: Give your finished block one last press to ensure everything lies flat.
Tips for Success
- Accurate Cutting: Precise cutting is crucial in quilting, especially for a block like the Sawtooth Star. Make sure your fabric pieces are cut exactly to size to ensure that everything fits together properly.
- Use Pins or Clips: When sewing the rows together, pin or clip your seams in place to prevent them from shifting as you sew.
- Consistent Seam Allowances: A quarter-inch seam allowance is standard in quilting. Using a quarter-inch foot on your sewing machine can help you maintain consistent seams throughout the project.
- Pressing Matters: Press your seams as you go to ensure accuracy and flat blocks. Pressing to one side or open is a personal preference, but consistency in pressing will result in cleaner seams.
- Experiment with Colors: The Sawtooth Star block is an excellent opportunity to play with color. You can use a monochromatic palette, contrasting colors, or even go scrappy by using different fabrics for the star points.
Variations of the Sawtooth Star Block
Once you’ve mastered the basic Sawtooth Star block, feel free to experiment with variations. You can change the size of the block by adjusting the size of the squares and rectangles you cut, or you can combine multiple Sawtooth Star blocks to create an entire quilt. Here are a few ideas to inspire you:
- Scrappy Sawtooth Star: Use different fabric scraps for each star point to create a unique and colorful block.
- Mini Sawtooth Star: Create a smaller version of the block by reducing the size of the squares and rectangles. Mini blocks are perfect for incorporating into smaller projects like pillows, table runners, or wall hangings.
- Framed Sawtooth Star: Add a border around your Sawtooth Star block to create a framed effect. This can be done with solid fabric or pieced borders for added interest.
Conclusion
The Sawtooth Star block is a timeless and versatile design that is perfect for beginners. With its bold, geometric starburst pattern, this block can be used on its own or combined with other blocks to create stunning quilts, pillows, and more.
By following this step-by-step guide, you’ll be able to create your own Sawtooth Star block with ease. Don’t be afraid to experiment with colors and variations as you build your skills and confidence as a quilter. Happy sewing!